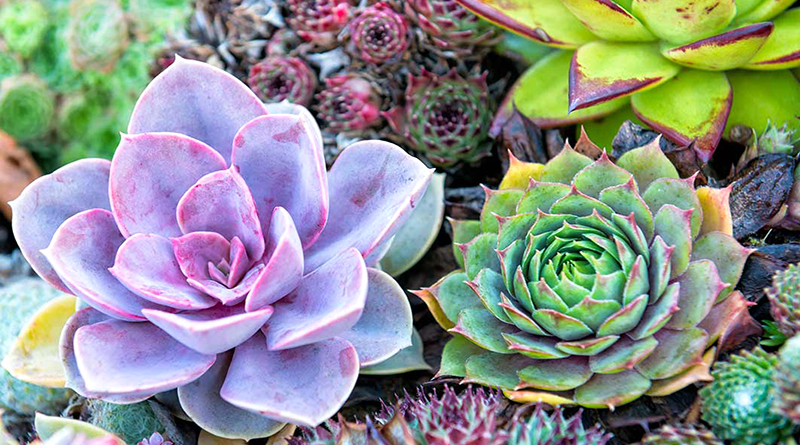
What to Do After Purchasing A Succulent Plant
Step 1: Allow the Plant to Rest Before Doing Anything Else
A few days after bringing your new succulents into your home, they will need some time to settle in. Rest periods can last anywhere from three days to a week.
Moving from the greenhouse or store to your home is a significant transition for them. They must adapt to new conditions of temperature, humidity, lighting, and so on.
Because of this, it is best not to water or handle them immediately after they arrive at home.
Place your succulents in a well-lit, airy, and peaceful location. Avoid exposing them to extreme temperatures of heat or cold, as well as direct sunlight, as they can get sunburned.
Do not mix them with your other plants. In some cases, new plants may be infested with pests. Preventing a single pest from spreading to all your plants is the best way to keep it from doing so.
Finally, avoid watering them for the first week. You don’t know when the succulents were last watered. Also, with succulents, it’s better to underwater than overwater, so don’t water.
Step 2: Identify the Succulent Types
During your rest period of the new succulent, you can research the name of your succulents (if you don’t know it already). You can identify your succulents by following these tips.
Knowing the type of succulent, you’re dealing with can help you better understand its specific needs.
A better understanding of the plant’s needs will allow you to determine how much light, water, and the substrate it requires.
Step 3: Examine Your Succulent’s Health
Examining the succulents is one of the steps before transplanting them. Keep an eye out for signs of dehydration or over-watering on the stems and leaves.
Succulents that show signs of overwatering, such as yellow, limp, or watery leaves, remove from the substrate and placed on absorbent paper for a few days to remove excess water.
Step 4: Check For Pests In Your Succulent
See if you can find evidence of pests, including wilted or scarred leaves and stems, bugs, or eggs.
It’s essential to keep new plants quarantined and treated until you’re sure there aren’t any pests on them. Make sure to do this after purchasing a succulent.
Step 5: Remove Any Dried or Dehydrated Leaves
Pests can hide in these, and their decomposition can lead to fungus and rotting. Also, cut dry flowers and very woody stems. Remove any dust or dirt with a soft brush or a blower, taking care not to damage the farina.
Step 6: Propagate Your Succulents
You may want to propagate your succulents, depending on your plants’ size, condition, and species.
Splitting a well-grown succulent into smaller plants is possible if the plant is healthy and has a good size.
Step 7: Replace The Pot
Choose a pot that you like and that you think is appropriate for your succulents. Ensure the pots are the correct size for the plants and have drainage holes (unless you decide to make a terrarium). Consider the design, colors, and materials as well.
Step 8: Change The Substrate
It’s a good idea to switch out the substrate the plant comes in for one that you can trust.
This ensures that there are no pests on the substrate that can spread to other plants. Try to find a substrate that is suitable for succulents in your climate.
In addition, some succulents are sold in unsuitable substrates for growth. When it comes to propagating our succulent plants, some nurseries and stores use cheap, lightweight substrates.
So Because of this, I always recommend changing the substrate they come in for a reliable mix, whether purchased or homemade.
Step 9: Succulents Benefit From Mulching
Succulent you should pick the one you like the most and think is best suited to your plants.
As a rule, don’t water your succulents on the day of transplantation. Succulents’ roots can be damaged during transplantation because of the plant’s delicate nature.
After transplanting, we should wait at least a few days before beginning to water. This allows your succulents to heal while avoiding potential rotting issues.
mulching isn’t just for aesthetics; in this article, we explain the benefits of adding a layer of “stones” to the substrate of your succulents.
Step 10: Transplanting
After a period of rest, once you’ve identified your plants, learned about their specific needs, and checked or put into practice the previous points, it’s time for transplantation.
Step 11: Adaptation
After transplanting, you can schedule watering and placing your succulents in the location where you have permanently placed them.
Plants have specific needs, so make sure the location you choose is suitable. For example, check the lighting, whether they will get rain or if you will control the watering, the temperatures they will be exposed to, and so on.
If your succulent’s “final location” requires a significant adjustment, you must make it work. Watch for any sudden changes in their condition. Gradually introduce the changes.
114 total views, 1 views today